To all you bargain hunters out there,
we all know there is nothing better than finding that perfect item for an absolute STEAL!!
Every time summer comes around,
There is one thing I get extremely excited for .....
GARAGE SALES!!!!
And this year definitely didn't disappoint.
About a month ago we were driving up to my in-laws and came across a little garage sale a block down his road,
{and of course not being able to pass a great bargain --- I made Sam stop to have a look}
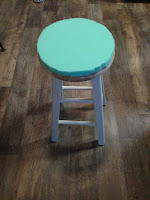
Where I came across four sturdy wooded bar stools
{which i've been looking for a great set since we've been married --- just couldn't bring myself to pay $60 a stool}
I ended up paying $4 a stool
--- seriously ecstatic about my new purchase ---
my mind started running through ideas,
of how I could make these plain brown stools,
into something that fits our little love nest!
I thought about just spray painting them cream,
--- but then i thought of the countless hours my husband will be sitting on them studying ---
And decided that they needed to have a cushion!
Soo here it is...
My step by step tutorial of how to make the perfect bar stools!!
Firstly I grabbed one of my bargain stools and made a trip to my local craft store... where I purchased
2/3 cans of Spray paint
{ your choice of colour }
1" sponge padding
{ I got green because there wasn't any white coloured }
A spray Adhesive
A thick white material - mine was a flannel type material that would cover the green sponge
A material of your choice that will be the cover for the stools
{ Depending on the size of your stools the amount of material will change
--- to be safe i purchased 2 yards of each and have some left over }
Plain buttons that you can cover in fabric --- I bought these from Joann's
{ Enough so their is 4 per stool }
String
Staple Gun
- I then started by spray painting each of the chairs
{ You don't painting the tops of the chair seats since they will be covered with fabric anyway it will be a waste}
- I then measured out where I wanted my buttons to go
--- This part was little difficult to get absolutely perfect ---
In the end I resulted in tracing the top of the stool on top of a large piece of paper... I then folded it into quarters to find the middle of the stool. From there I worked out the places for buttons.
- After I was happy with the positions of where I will place my buttons I used an electric drill to dill 4 holes all the way through the top of the stool.
{ Be careful you don't position the buttons holes over the legs of the stool }
- Then trace the top of your stool onto the sponge, cut and stick it on with spray adhesive !!
- I then traced around the chair leaving enough fabric to pull over the edge of the chair and stick down with the spray adhesive.
{I forgot to get a photo of during this step but its pretty self explanatory --- pull the fabric as tight as possible --- For me the legs were the hardest part, I cut a slit at each leg}
- Then I repeated this step with my cute chair fabric --- but this time instead of using spray adhesive to stick down the fabric, I used a staple gun and hammer to secure the staples! --- use plenty!!!
And WALA
All that is left to do is the cute buttons!!!
- Which I bought this a button making kit from Joann's
{but i'm pretty sure you can find one from any crafting store}
With the left overs fabric, I followed the instructions on the packet to cover my buttons. I then tied the button to a piece of string {long enough to go through the chair and be stapled and tied at the bottom!} Then I pressed down where the hole was and put the needle through.
{keeping the button pushed down as tight as possible} turn the chair over and staple the string tight in 3 different directions to make sure its secure!{its easier if you do this step with someone}
and here you have it!!! my perfect $8 bar stools!!!
{keeping the button pushed down as tight as possible} turn the chair over and staple the string tight in 3 different directions to make sure its secure!{its easier if you do this step with someone}
and here you have it!!! my perfect $8 bar stools!!!


No comments:
Post a Comment